Understanding the Basics of Gimble Stabilizers
What is a Gimble and How Does It Work?
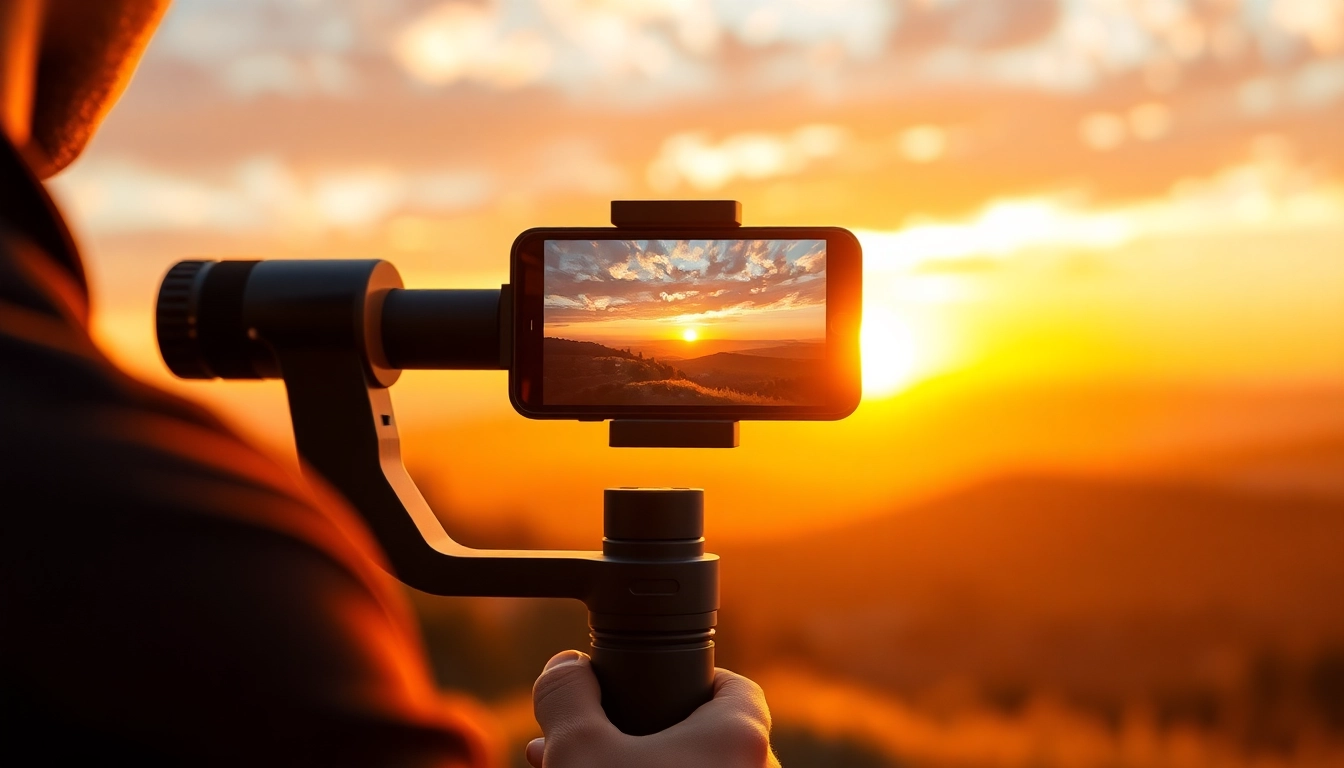
A gimble is a mechanical device designed to allow the rotation of an object about an axis. It’s commonly used to stabilize cameras and smartphones while shooting video, ensuring smooth footage without the unwanted shake resulting from hand movements. At its core, a gimble consists of three rings that are mounted on each other, allowing rotation in multiple directions. This design helps maintain the orientation of the camera stabilizer while the operator moves, effectively counteracting any shift in position.
Types of Gimble for Different Uses
The variety of gimble devices available today caters to different filming needs, from casual smartphone users to professional filmmakers. Some common types include:
- Smartphone Gimbles: Designed for mobile devices, these gimbles often incorporate features that enhance user-friendliness, such as quick-release mounts and automatic face tracking.
- Camera Gimbles: These are suitable for DSLRs and mirrorless cameras. They tend to be more robust, providing better stabilization and often incorporating settings for advanced filmmakers.
- Action Camera Gimbles: Smaller and more rugged, these are built for action cameras, making them perfect for outdoor adventures or extreme sports filming.
Key Features to Look For in a Gimble
When selecting a gimble, consider the following key features:
- Axis Stabilization: Most modern gimbles offer 3-axis stabilization, which helps in managing pitch, roll, and yaw movements.
- Payload Capacity: Ensure the gimble can support the weight of your device. Some models can handle heavier setups, while others are designed specifically for lightweight smartphones.
- Battery Life: Look for gimbles with extended battery life to avoid interruptions during long shooting sessions.
- Ease of Use: Many users prefer gimbles with intuitive controls and quick setup features.
Benefits of Using a Gimble for Filmmaking
Enhancing Video Quality with Stabilization
One of the most significant advantages of using a gimble is the substantial improvement in video quality. Without stabilization, video footage can appear jerky and unprofessional, particularly during dynamic movements. A gimble’s stabilization technology smoothens out these motions, allowing for more cinematic shots. This stabilization is crucial when capturing fast-paced action scenes or moving through crowds, where handheld footage could otherwise lead to viewer discomfort.
How a Gimble Improves Shooting Techniques
Using a gimble can fundamentally enhance your shooting techniques. Here are some ways how:
- Smooth Panning: Instead of jarring cuts or unnatural movements while panning, gimbles allow for fluid transitions from one scene to another, emphasizing the storytelling aspect.
- Dramatic Depth of Field: With a stable shot, filmmakers can take advantage of lens effects to create a beautiful depth of field without worrying about shake ruining the effect.
- Dynamic Shots: Gimbles facilitate creative camera movements such as tracking shots, revealing shots, and dolly movements, empowering filmmakers to envision complex sequences that were previously challenging in handheld formats.
Use Cases Where a Gimble Shines
The versatility of gimbles is evident across numerous filming scenarios:
- Event Coverage: Weddings, parties, and corporate events benefit immensely from the smooth capturing of moments as gimbles handle transitions effortlessly.
- Travel Videos: When filming while on the move, such as hiking or cycling, a gimble can capture beautiful scenery without the shaking that handheld shooting can produce.
- Documentaries: Cinematographers often require stealth and mobility in documentary filmmaking. A gimble’s silent operation allows for unobtrusive shooting in delicate situations.
Setting Up Your Gimble: Step-by-Step Guide
Assembling Your Gimble Correctly
The setup process for a gimble can vary by model but typically involves similar steps:
- Start by attaching the camera or smartphone to the gimble’s mounting plate securely.
- Adjust the gimbal arms into their locked position before powering the device.
- Power the gimble on and allow it to calibrate, which might involve manually adjusting the device until balanced correctly.
Tuning Your Gimble for Optimal Performance
Tuning your gimble is key to achieving the best performance. Adjust the following settings:
- Sensitivity Settings: Tweak the responsiveness of the gimble based on the shooting scenario – less sensitivity for smoother, slower scenes, and higher for dynamic, fast-actions.
- Follow Modes: Understand the different follow modes available (e.g., pan follow, tilt follow, and lock mode) and set according to your filming needs.
Getting the Right Balance for Best Results
Achieving balance is crucial for optimal performance. Here’s how:
- Begin with placing your camera horizontally on the gimble’s plate. Make adjustments to ensure it sits evenly.
- Slide the mounting plate backward or forward to find a spot where the camera can stay level without your hands.
- Fine-tune the side-to-side balance by turning the gimble sideways, checking if it tilts left or right without added force.
Advanced Techniques for Filming with a Gimble
Creative Movements to Elevate Your Videos
Once comfortable with basic functionality, filmmakers can explore advanced techniques:
- Low-Angle Shots: Position the gimble low to the ground to capture an immersive perspective, ideal for nature detailing or dramatic settings.
- High-Angle Shots: Maintain the gimble above head height for dynamic overviews or crowd shots, providing a unique viewpoint.
- Orbiting Shots: Use the gimble’s rotational abilities to circle around subjects smoothly, weaving in landscape elements for a sophisticated narrative style.
Understanding the Importance of Angles and Shots
The angle from which you capture your subject can influence viewer perceptions significantly. Techniques to consider include:
- Rule of Thirds: Frame your shots by dividing the screen into thirds to create a more engaging composition.
- Leading Lines: Use natural lines in scenes (like roads or rivers) to guide viewers’ eyes to focal points.
- Symmetry and Patterns: Capture symmetrical scenes for a visually intriguing effect, often found in architecture or natural landscapes.
Tips for Using a Gimble in Different Environments
Different environments call for unique setups and adjustments:
- Indoor Settings: Pay attention to light sources and shadows. Indoors may require slower movements and different sensitivity settings for stabilization.
- Outdoor Adventures: Secure your equipment well and expect varying terrain. Proactive adjustments may be necessary for uneven surfaces.
- Nights and Low-Light Conditions: Select settings that allow for longer exposures if using low-light environments to prevent frame drops.
Maintenance and Troubleshooting Your Gimble
Essential Care Tips for Longevity
Maintaining your gimble will extend its lifespan and function. Follow these basic care tips:
- Regularly check and replace batteries to prevent any sudden failures during shoots.
- Clean your gimble after each use, ensuring no dust accumulates, especially on moving parts.
- Store your gimble in a protective case when not in use to avoid any accidental damage.
Common Issues and How to Fix Them
Even high-quality gimbles can encounter issues. Here are some common problems and solutions:
- Camera Drift: Often occurs when the device is not balanced correctly. Recheck and adjust balancing as needed.
- Battery Drain: If your battery runs down quickly, ensure you’re using compatible and fully charged batteries; also check for any background features causing excess battery usage.
- Connectivity Issues: If your gimble isn’t connecting to the camera or smartphone, check for outdated firmware or reset the device to reconnect.
When to Upgrade Your Gimble
As technology advances, you may find the need to upgrade your gimble. Consider an upgrade if:
- Your current model does not support newer camera models you wish to use.
- You require enhanced features, such as better battery life, advanced stabilization, or additional follow modes.
- You’re frequently capturing professional-level work and need improved ergonomics and lightweight designs.